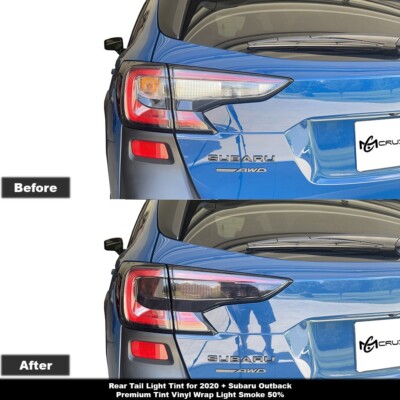
Have you ever thought about tinting your car’s tail lights? It’s a simple way to give your vehicle a sleek, custom look that stands out on the road.
But it’s not just about style—tinted tail lights can also protect your lights from damage and add a layer of privacy. Before you rush to darken those lenses, there are important things you need to know. You’ll discover the benefits, risks, and best methods for tinting your car’s tail lights safely and effectively.
Keep reading to learn how to make your car look sharper without compromising safety or legality.
Benefits Of Tail Light Tinting
Tinting your car’s tail lights offers more than just a sleek look. It brings several practical advantages that can enhance your driving experience and car maintenance. Understanding these benefits can help you decide if tail light tinting is right for your vehicle.
Enhanced Aesthetic Appeal
Tinted tail lights instantly give your car a more polished and modern look. They create a seamless appearance that complements the overall style of your vehicle. If you want your car to stand out without major modifications, tinting is a simple way to add that edge.
Many car enthusiasts notice how tinting tail lights can match other darkened elements like windows or rims. This uniformity boosts the visual impact and can make your car look more custom and well-thought-out. Have you ever thought about how small changes can dramatically improve your car’s appearance?
Improved Privacy And Security
Darkened tail lights can obscure the view of your car’s interior lighting, which adds a subtle layer of privacy. Although tail lights aren’t windows, reducing light glare can deter unwanted attention in some situations. This effect might make your vehicle less noticeable at night, adding to security.
Besides privacy, tinted tail lights can signal that you care about your vehicle’s look and upkeep. Thieves often avoid cars that appear well-maintained and customized. Could tinting your tail lights contribute to making your car less of a target?
Protection Against Damage
Tint films act as a protective barrier for your tail lights against minor scratches, chips, and UV damage. This means your tail lights stay clearer and brighter for longer periods. Over time, this protection can save you money on repairs or replacements.
Think about how your tail lights face constant exposure to harsh weather and road debris. Tinting can reduce fading and cracking caused by sunlight and environmental factors. Isn’t it worth protecting such a crucial safety feature with a simple upgrade?
Types Of Tail Light Tint Films
Tail light tint films come in various shades and materials to change your car’s look. Some offer a light smoke, while others provide a darker, almost black finish. Each type balances style with safety by allowing brake lights to remain visible.
Tinting your car’s tail lights can dramatically change its aesthetic, adding a sleek and customized look. But with so many types of tint films available, how do you choose the right one for your needs? Understanding the options can help you make an informed decision that suits both your style and functional requirements.Dyed Film
Dyed film is one of the most popular choices for tail light tinting. It offers a classic, smoky appearance that can give your car a subtle, elegant look. The film is made by layering dye between an adhesive and a protective layer. While it’s affordable and easy to apply, dyed film may fade over time, especially if exposed to intense sunlight. Consider this if you live in a sunny area or frequently park outdoors.Metalized Film
Metalized film is another option that provides a reflective shine, perfect for those who want their vehicle to stand out. This film contains tiny metallic particles that reflect light, enhancing both appearance and durability. However, the metal content can interfere with radio signals, which might be an issue if you rely on features like GPS or satellite radio. Weigh the benefits of its durability against potential tech disruptions before deciding.Carbon Fiber Film
If you’re after a more rugged look, carbon fiber film might be the way to go. This type of film mimics the texture and appearance of carbon fiber material, adding a modern, high-tech edge to your car. Although it’s a bit pricier than other options, the unique aesthetic and robust quality can be worth the investment. Imagine the satisfaction of having a car that not only looks unique but also showcases your attention to detail.Laminated Film
Laminated film offers an extra layer of protection due to its multi-layered construction. This makes it an excellent choice if you want to safeguard your tail lights from scratches and minor impacts. While it provides added durability, the installation process can be more complex, sometimes requiring professional help. Are you ready to invest in the longevity of your tail lights, or would you prefer a simpler DIY option? Choosing the right tail light tint film depends on your style preference, budget, and how much protection you need. Consider these factors carefully to make your car both look and perform at its best.Tools And Materials Needed
Before you start tinting your car’s tail lights, gathering the right tools and materials is crucial. Each item plays a key role in achieving a smooth, professional finish. Without them, you risk bubbles, peeling, or uneven tinting that can ruin the look and safety of your lights.
Tint Film
The tint film is the heart of the project. Choose a high-quality, automotive-grade film designed specifically for tail lights to ensure durability and proper light transmission. Look for films with UV protection and easy application features like pre-cut shapes or a clear liner for better control.
Have you noticed how cheaper films tend to peel or bubble quickly? Investing in a reliable brand saves you time and frustration later.
Cleaning Supplies
Proper cleaning is non-negotiable. Use isopropyl alcohol or a dedicated automotive surface cleaner to remove dirt, grease, and wax from the tail lights. A lint-free microfiber cloth helps avoid scratches and keeps the surface perfectly smooth before applying the film.
Skipping this step often leads to trapped dirt under the film, causing bubbles and poor adhesion. Think of it as prepping a canvas before painting—how can you expect a flawless finish otherwise?
Application Tools
You’ll need a few handy tools to get the film on right. A squeegee with a soft edge helps push out air bubbles and smooth the film evenly. A sharp utility knife or precision blade is essential for trimming excess film without damaging your tail lights.
Also, keep a spray bottle with a mix of water and a few drops of dish soap ready. Spraying this on the tail light before applying film lets you reposition the film easily before it sticks for good.
Heat Gun Or Hair Dryer
A heat gun or a powerful hair dryer helps mold the film around curves and edges, making it conform perfectly to the tail light’s shape. Heat softens the film’s adhesive and material, reducing wrinkles and bubbles during application.
Be cautious with the temperature—too hot can warp the plastic lens, while too cold makes the film stiff and hard to work with. Have you ever tried shaping something cold and rigid? It’s frustrating and messy, right?
Step-by-step Tinting Process
Tinting your car’s tail lights is a simple way to enhance its look. The process requires patience and careful handling to get a smooth finish. This step-by-step guide breaks down each stage for a clear and easy application.
Preparing The Tail Lights
Clean the tail lights thoroughly using soap and water. Remove all dirt, dust, and grease for better film adhesion. Dry the surface with a soft cloth to avoid water spots. Make sure the tail lights are cool to the touch before starting.
Measuring And Cutting The Film
Measure the tail light area carefully with a tape measure. Cut the tint film slightly larger than the measured size. Use a sharp utility knife or scissors for precise cuts. Keep the edges clean and straight to avoid wrinkles.
Applying The Film Smoothly
Spray a mixture of water and a few drops of soap on the tail lights. Peel the backing off the tint film gently. Place the film on the wet surface, aligning it with the edges. Use a squeegee to press the film down slowly from the center outwards.
Removing Air Bubbles
Check for trapped air bubbles under the film. Use the squeegee to push bubbles toward the edges. For stubborn bubbles, gently lift the film and reapply. Patience ensures a smooth, bubble-free finish.
Finishing Touches
Trim any excess film around the edges with a sharp knife. Use a heat gun or hair dryer on low heat to seal the film edges. Let the tint dry for 24 hours before exposing it to water or heavy use. This step secures the film and improves durability.
Legal Considerations
Tinting your car’s tail lights can give your vehicle a sleek, customized look. However, before you dive into this modification, it’s crucial to understand the legal considerations involved. Ignoring these rules can lead to fines, failed inspections, or even safety hazards on the road.
Local Tinting Regulations
Each state or country has specific laws about how dark or reflective your tail light tint can be. Some places allow light tinting, while others ban it entirely. You should check your local Department of Motor Vehicles (DMV) or transportation authority website for clear guidelines.
For example, in California, tail light tinting is only legal if it does not reduce the light’s visibility by more than 50%. In contrast, New York has stricter rules and may not permit any tinting on tail lights. Failing to comply could mean getting pulled over or your vehicle failing an inspection.
Ensuring Safety Compliance
Your tail lights play a vital role in signaling to other drivers, especially at night or in bad weather. Tinting that’s too dark can reduce light output, causing safety risks. Ask yourself: does your tint allow brake lights, turn signals, and reverse lights to be clearly seen?
One way to stay safe is to test your tinted tail lights in different lighting conditions. You might also consider using a high-quality tint film that’s designed to maintain brightness while darkening the glass. Remember, aesthetics should never compromise your visibility or the safety of others on the road.

Credit: www.amazon.com
Maintenance Tips For Tinted Tail Lights
Maintaining tinted tail lights keeps them looking fresh and functioning well. Proper care prevents damage and extends the tint’s life. Follow these tips to protect your investment and ensure safety on the road.
Cleaning Techniques
Use a soft cloth or sponge to clean tinted tail lights. Avoid rough materials that can scratch the surface. Mild soap and water work best for removing dirt. Rinse thoroughly and dry with a microfiber towel. Avoid harsh chemicals or abrasive cleaners that can damage the tint.
Avoiding Damage
Park away from direct sunlight when possible to reduce fading. Avoid pressure washers or strong water jets on the tinted area. Be gentle when opening and closing the trunk or tailgate. Check for any signs of peeling or bubbling regularly. Protect the tint from sharp objects and car washes with brushes.
When To Replace The Tint
Replace the tint if it shows cracks, bubbles, or peeling. Faded tint reduces visibility and can be unsafe. If moisture gets trapped under the tint, replacement is needed. Consider replacing the tint after several years to maintain a fresh look. Timely replacement ensures clear light signals and road safety.
Common Mistakes To Avoid
Tinting your car’s tail lights can give your vehicle a sleek, customized look. However, many people run into problems because they overlook key details during the process. Avoiding common mistakes can save you time, money, and frustration while ensuring your tail lights look professional and function properly.
Poor Surface Preparation
Skipping proper cleaning and sanding is a big mistake. Dirt, dust, or grease on the tail light surface prevents the tint film from sticking well. This can cause bubbles, peeling, or uneven tint.
Before applying the tint, thoroughly clean the tail lights with soap and water, then wipe them down with rubbing alcohol. Take your time to remove every speck of dirt or oil.
Have you ever tried to stick a sticker on a dusty window? It doesn’t hold well, right? The same idea applies here. Proper prep is key to a smooth finish.
Incorrect Film Application
Applying the tint film without the right technique leads to wrinkles, bubbles, or misalignment. Many rush the process and fail to use enough heat or water to position the film correctly.
Use a spray bottle with soapy water to help slide the film into place before pressing it down. A heat gun or hairdryer helps the film conform to curves and prevents peeling later.
One time, I tried to rush tinting my tail lights and ended up with a creased patch that ruined the look. Taking it slow and steady makes all the difference.
Ignoring Legal Limits
It’s tempting to go very dark for style, but many areas have strict laws about how tinted your tail lights can be. Too dark, and you risk fines or even your car failing inspection.
Check your local regulations before tinting. Some places require a minimum amount of light to shine through for safety reasons.
Ask yourself: Is the tint enhancing your car’s look without compromising visibility? Staying within legal limits protects you and other drivers on the road.

Credit: www.youtube.com
Professional Vs Diy Tinting
Tinting your car’s tail lights can give your vehicle a sleek, personalized look. But deciding between professional and DIY tinting is a crucial step that affects cost, quality, and effort. Understanding the differences helps you choose the best option for your needs and budget.
Cost Comparison
DIY tinting kits usually cost between $20 and $50, making them attractive for budget-conscious car owners. Professional services can range from $100 to $300 depending on your location and the quality of the film used.
While DIY seems cheaper upfront, mistakes can lead to wasted materials and extra expenses. Have you considered how much you might spend if you need to redo the tint after a botched attempt?
Quality Differences
Professionals bring experience and precision to the job, resulting in a smooth, bubble-free finish that lasts longer. Their tools and expertise reduce the risk of peeling or discoloration over time.
DIY projects often struggle with air bubbles, wrinkles, or uneven application. If the tint is your first attempt, the final look might not match your expectations. Are you confident in your skill to handle delicate materials without damaging your tail lights?
Time And Effort
DIY tinting can be time-consuming, especially if you’re learning as you go. Expect to spend several hours cleaning, cutting, applying, and adjusting the tint film.
Professional tinting usually takes less than an hour, freeing your time for other activities. Plus, the convenience of leaving the job to experts can be worth the extra cost, especially if you value a hassle-free experience.

Credit: www.ebay.com
Frequently Asked Questions
What Are The Benefits Of Tinting Car Tail Lights?
Tinting tail lights enhances your car’s aesthetic appeal and adds a sleek, custom look. It also reduces glare and protects lights from UV damage. However, ensure tinting complies with local traffic laws to maintain safety and visibility on the road.
Is Tinting Tail Lights Legal For All Vehicles?
Tail light tinting legality varies by location. Some regions allow light tinting if tail lights remain visible from a set distance. Always check your local traffic laws before tinting to avoid fines or safety issues related to reduced light visibility.
How Long Does Tail Light Tinting Last?
Tail light tinting typically lasts 3 to 5 years, depending on the quality of materials and application. Proper maintenance and avoiding harsh cleaning chemicals can extend the life of the tint. Over time, tint may fade or peel, requiring reapplication.
Can I Tint Tail Lights Myself Or Hire A Professional?
DIY tinting is possible with the right tools and patience. However, professional tinting ensures a smooth, bubble-free finish and proper compliance with regulations. If unsure, hiring a professional is recommended for best results and safety.
Conclusion
Tinting your car’s tail lights adds style and a sleek look. It can also protect the lights from scratches and dirt. Always check local laws to stay safe and legal. Choose quality tint films for the best results. Take your time during installation to avoid bubbles and wrinkles.
A well-done tint can make your car stand out on the road. Enjoy the new look while driving safely every day. Tail light tinting is a simple way to improve your car’s appearance.