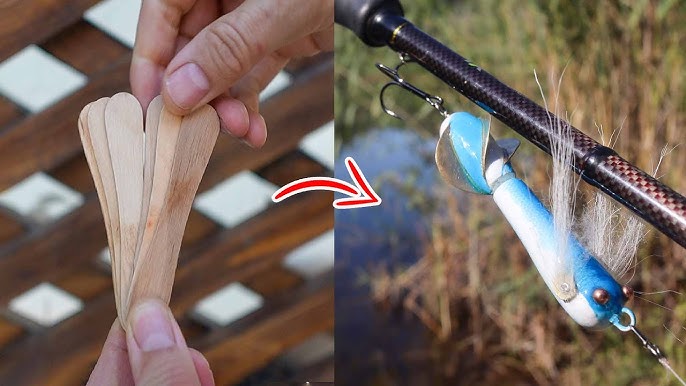
Ever wondered how to make a fishing lure that not only catches fish but also your friends’ attention? You’re about to dive into a rewarding DIY project that brings joy both on the water and at your workbench.
Imagine the thrill of reeling in a catch with a lure you crafted yourself. It’s an experience that connects you to the art of fishing in a whole new way. As you read on, you’ll discover step-by-step instructions, insider tips, and the secrets to creating lures that mimic the real deal.
Ready to elevate your fishing game and impress the local fishing community? Let’s get started!
Materials Needed
Making a fishing lure requires several materials. These materials help shape and finish the lure for fishing.
Choosing the right materials is important. They affect the lure’s look and how it works in water.
Types Of Wood And Plastic
Wood and plastic are common materials for fishing lures. Each type has its own benefits for building lures.
Wood is easy to shape and floats well. Plastic can be molded and is very durable.
- Wood Types:Balsa, cedar, basswood
- Plastic Types:Acrylic, PVC, polyethylene
Essential Tools
You need some basic tools to make a fishing lure. These tools help cut, shape, and smooth the materials.
Good tools make your work easier and give a better finish to the lure.
- Sharp knife or carving tools
- Sandpaper of various grits
- Drill for making holes
- Clamps or vise to hold pieces
- Files for shaping edges
Paints And Finishes
Paint makes the lure attractive to fish. Finishes protect the lure from water damage.
Choose paints that stick well to wood or plastic and dry fast. Use clear coats to seal the paint.
- Acrylic paints for bright colors
- Spray paints for even coverage
- Clear epoxy or polyurethane finishes
- Brushes or airbrush for paint application
Designing Your Lure
Designing a fishing lure takes creativity and care. A good design can catch more fish. Focus on shape, color, and small details.
Each part of your lure affects how fish see it. You want it to look real and move well in water.
Choosing The Right Shape
Shape affects how your lure moves in water. Some shapes swim fast, others float or dive deep.
- Long and slim shapes mimic small fish swimming fast.
- Rounder shapes look like wounded prey and move slowly.
- Flat shapes can flutter and attract fish near the surface.
- Jointed shapes add extra movement to imitate real fish.
Selecting Colors And Patterns
Colors help your lure stand out or blend in depending on water clarity and light. Patterns add realism and attract fish.
| Water Type | Best Color | Effective Pattern |
| Clear Water | Natural colors like silver or green | Striped or spotted |
| Murky Water | Bright colors like chartreuse or orange | Bold and contrasting |
| Low Light | Dark colors like black or blue | Solid or glittery |
Adding Details For Realism
Small details make your lure look real and attract fish. Add eyes, scales, and texture to your lure.
- Use small stickers or paint to create eyes.
- Apply textured paint for scale effects.
- Add glitter or reflective tape for shine.
- Use a fine brush to paint gill lines or fins.
Shaping The Lure
Shaping the fishing lure is an important step. It gives the lure its form and helps it attract fish.
This process involves cutting, smoothing, and preparing the lure for hooks. Each step needs care and attention.
Cutting And Carving Techniques
Start by cutting the lure shape from wood or plastic. Use sharp tools like knives or small saws for clean cuts.
- Draw the lure shape on the material first.
- Use a coping saw or craft knife to cut along the lines.
- Carve details with a small chisel or carving knife.
- Work slowly to avoid mistakes and rough edges.
Sanding For Smoothness
Sanding removes rough spots and shapes the lure’s surface. It makes the lure look better and swim well in water.
| Sandpaper Grit | Purpose |
| 80-100 | Remove large rough spots |
| 150-220 | Smooth the surface |
| 320-400 | Prepare for painting or finishing |
Drilling Hook Holes
Drill holes where the hooks will attach. Use a drill bit that fits the hook rings well.
Tips for drilling hook holes:
- Mark the hole spots clearly before drilling.
- Hold the lure firmly to avoid slipping.
- Use a small drill bit to start, then widen if needed.
- Drill straight to keep hooks aligned properly.

Credit: www.youtube.com
Painting And Finishing
Painting and finishing are key steps in making a fishing lure. These steps give the lure its look and protect it from water damage. Proper painting and sealing make the lure last longer and attract more fish.
Use the right paints and techniques to get the best results. Take your time to apply each layer carefully and let it dry well before moving to the next step.
Applying Base Coats
Start by applying a base coat to your lure. This coat forms the background color and helps the other paint layers stick better. Use spray paint or brush-on paint for an even finish.
- Clean the lure surface before painting
- Choose a light or neutral base color
- Apply thin, even coats to avoid drips
- Let each coat dry completely
- Sand lightly between coats if needed
Creating Patterns And Highlights
After the base coat dries, add patterns and highlights to make the lure more attractive. Use small brushes or stencils for shapes like stripes or dots. You can also use a sponge or airbrush for soft color blends.
| Pattern Type | Tools Needed | Effect |
|---|---|---|
| Stripes | Fine brush or stencil | Mimics fish scales or fins |
| Dots | Dotting tool or toothpick | Creates natural spots or eyes |
| Blending | Sponge or airbrush | Soft color transitions |
Sealing The Lure
Seal the painted lure with a clear coat. This protects the paint from water, scratches, and sun damage. Use a glossy or matte finish depending on your lure style. Apply several thin coats for the best protection.
- Choose a waterproof clear coat spray
- Apply in a well-ventilated area
- Spray from 6-8 inches away
- Let each coat dry fully before next
- Handle the lure carefully after sealing
Attaching Hardware
Attaching hardware is an important step in making a fishing lure. It helps your lure work well in the water.
This part includes adding hooks, eyes, split rings, weights, and other parts. Each piece makes your lure better.
Choosing Hooks And Eyes
Hooks catch the fish, so choose strong and sharp ones. The size depends on the fish you want to catch.
Eyes add realism to your lure. Use plastic or glass eyes and glue them securely on the lure body.
- Pick hooks that fit your lure size
- Use sharp hooks for better catch rate
- Attach eyes where fish can see them easily
- Glue eyes firmly to avoid falling off
Installing Split Rings
Split rings connect hooks to the lure. They allow hooks to move freely for better action.
Use pliers to open the ring and slide it through the hook and lure eye. Close the ring tightly.
- Choose split rings that match hook size
- Open the ring with pliers carefully
- Attach ring to hook and lure eye
- Close the ring fully to secure parts
Adding Weights And Accessories
Weights help your lure sink or stay balanced in water. Add them inside or outside the lure body.
Accessories like feathers or skirts add attraction. Attach them near the hooks or body for best effect.
- Use weights based on how deep you want to fish
- Secure weights so they do not fall off
- Attach feathers or skirts tightly to hooks
- Choose accessories that match fish type

Credit: www.youtube.com
Testing Your Lure
After making your fishing lure, testing is important. It helps you see if the lure works well in water.
Testing shows how the lure moves and floats. This step ensures fish will notice it.
Water Buoyancy Checks
Buoyancy means if the lure sinks, floats, or stays in the middle of the water. Check this first.
Put the lure in a bucket or tank of water. Watch how it behaves without pulling it.
- If it sinks too fast, add lighter materials or air pockets.
- If it floats too much, add weight or denser parts.
- Neutral buoyancy lets the lure stay at a certain depth.
Movement And Action Testing
Next, see how the lure moves when pulled through water. This attracts fish.
Pull the lure slowly and watch its action. Look for wobbling, diving, or spinning.
- Wobbling mimics injured fish.
- Diving helps lure reach fish deep in water.
- Spinning creates flashes that catch fish attention.
Making Adjustments
After testing, change the lure to fix problems. Small changes can make a big difference.
Add weight if the lure does not dive well. Cut fins or add lips to change action.
- Use tape or glue to add or remove parts.
- Test again after each change to see results.
- Repeat adjustments until the lure works well.
Tips For Success
Making your own fishing lure can be fun and rewarding. It takes some care and skill to get good results. These tips will help you avoid mistakes and keep your lures working well.
Focus on safety and proper handling. Troubleshoot issues quickly to save time. Keep your lures in good shape for longer use.
Safety Precautions
Always work in a well-ventilated area to avoid fumes from paint or glue. Wear safety glasses to protect your eyes from sharp tools and flying debris.
- Keep sharp tools away from children
- Use gloves when handling chemicals
- Store materials safely after use
- Read instructions on all products before use
Troubleshooting Common Issues
Sometimes your lure may not float or move as expected. Check the weight and balance first. Paint may peel if the surface was not clean or dry.
| Problem | Possible Cause | Solution |
| Lure sinks too fast | Too heavy or unbalanced | Remove weight or adjust balance |
| Paint peeling | Surface not clean or dry | Clean surface before painting |
| Lure moves oddly | Hooks or parts loose | Tighten or replace loose parts |
Maintenance And Storage
Keep your fishing lures clean after each use. Dry them well to avoid rust and damage. Store lures in a dry box or tackle case.
- Rinse lures in fresh water after saltwater use
- Dry completely before storing
- Check hooks and replace if rusted
- Store lures separated to avoid tangling

Credit: www.youtube.com
Frequently Asked Questions
What Materials Are Needed To Make A Fishing Lure?
You need wood or plastic for the body, hooks, paint, and split rings. Additional items include wire, eyes, and adhesive. These materials help create durable, attractive lures that mimic real bait effectively.
How Do I Shape A Fishing Lure Properly?
Use a saw, knife, or rotary tool to carve the lure body. Sand it smooth for a natural finish. Proper shaping ensures the lure moves realistically in water, attracting more fish.
What Type Of Paint Works Best On Fishing Lures?
Use waterproof, non-toxic acrylic or enamel paint for durability. These paints resist water and maintain color underwater. Applying a clear sealant protects the paint and extends the lure’s life.
How Do I Add Hooks Safely To A Fishing Lure?
Attach hooks with split rings using pliers carefully. Ensure hooks are sharp and secure to prevent losing fish. Proper hook placement improves lure effectiveness and fishing success.
Conclusion
Making your own fishing lure can be fun and rewarding. It lets you try different designs and colors. You can catch fish with something you created yourself. Just follow the steps carefully and be patient. Practice will help you improve your skills over time.
Enjoy the process and learn from your mistakes. Soon, you will have lures that work well on your fishing trips. Keep experimenting and have fun on the water!